We have bought are own site so we can offer even more free stuff. All information on this site and alot more is now on http://www.4sidedpolygon.com/
Wednesday, April 30, 2008
Tuesday, April 1, 2008
Making new pictures look old
Labels:
black and white photos,
blimishing,
photoshop,
sepia tone
This tutorial demonstrates how to make a modern digital image look old. We will be going through all of the step and techniques in photoshop to give same wear and tear of the second image. Below is the the before and after results. 
 First, find an image to use or feel free to use the image at the top of this tutorial.
Next, open the image in any Photoshop.
To start with we are going to pull out all of the color and bump up the contrast of our original image. Since we will be using a few different photoshop layers make sure layers are visible by going to Window>Layers in the photoshop menu at the top of the screen. This will show the layer pallette if it isn't alreay showing.
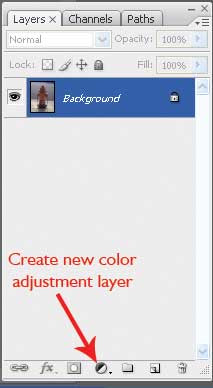
In the layer pallette select the Create new color adjustment layer icon like in the image below.
The adjustment layer will be a Hue/Saturation like in the image below.

In the Hue/ Saturation menu set saturation to -100 like below. After adding the hue/saturation layer add another adjustment layer like before and select Brightness/Contrast with the settings in the figure below.
 Now we will be adding a couple of color layers to give it an old sepia tone like in old photos.
Add a new empty layer by going to Layer>New>Layer in the top menu or the create new layer icon in the layer pallette. Use the paint bucket tool to fill in the layer with the color below. Now, duplicate the layer by going to Layer> Duplicate Layer in the top menu. Go to the layer pallette select "Layer1" and change the blending mode from Normal to Overlay and the Opacity should be brought down to 50%. (Shown on the left side in the below image)
Select the "Layer1 copy" and change it's blending to Color and it's opacity to 75%.(Shown on the right side in the below image)

Now duplicate the top layer and go to the color picker in the tool menu. Keep the tan color for the foreground and pick white as the background color. Go to Filter>Render>Clouds . This will help add some wear and tear on the image.
In the layer pallette select the cloud layer and change the blending mode to multiply and opacity to 50%.
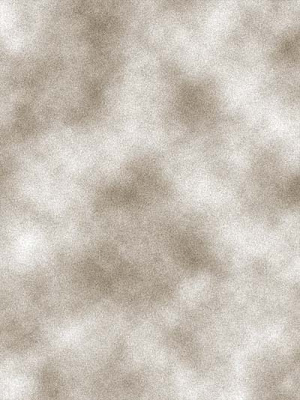
Next, select the cloud layer and go to Filter>Noise>Add Noise with the settings below. This step adds the film grain effect. Look at the second image (This image is prior to the blending and oppacity change)

 Add a new empty layer by going to Layer>New>Layer. This will be used for dust and scratch marks. In this layer use a few small brushes to add small white dots and slightly yellow marks around the layer. In the image below the tan background is just for demonstration. Blending and opacity can be kept as default for this layer.
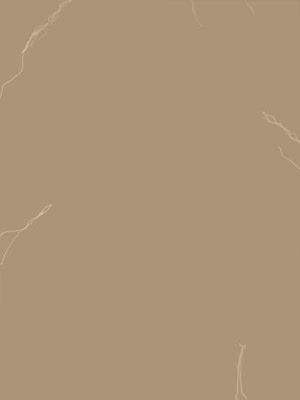
Create on last empty layer like in the previous step. This layer is for some fold marks within the image. To do this use a small tip brush of 1- 3 pixels and make lighting shaped lines near the corners. Then go back over with a small eraser (5-10 pixels soft brush ) to break up the lines a bit. When satisfied with the lines go to the layer palette and bring the layer's opacity to 85%. Use the below picture as reference.
 At this point, the image should look like the second image at the very top of the tutorial. For further experimentation change the adjustment Layers and color layer settings for other worn image effects.
Thank You For Reading.......................
Sunday, March 23, 2008
Applying Photoshop filters to image sequences
Labels:
filters,
image sequences,
photoshop
If you have an image sequence or video that has been converted to image sequences then it is possible to apply almost any photoshop filter, transforms and or processes to your work using Actions in Photoshop. Most any menu commands or tasks in photoshop can be recorded as an action to make a macro. This includes but not limited to resizing an image, doing color correction, and applying filters.
To start of with, make sure the image sequence is in a seperate folder because we will be applying a batch process to the whole folder. Next, open an image from the sequence in Photoshop. Next, to view the action pallette select Window>Actions which looks like the image bellow.
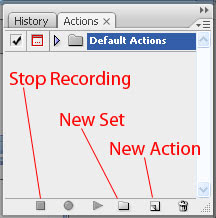
In the actions pallette select the folder icon to create a new folder set and give the set a unique name. Next select the Create new action icon which is to left of the trashcan icon in the action pallete and give it a unique name. To start recording actions press the Ok button.
In this example an image is going through just just two steps but a whole stream of actions can be recorded at once depending on the desired effect.
First select the Filter> Artistic> Neon Glow with the Glow Size of 5, Glow Brightness of 15, for Glow Color select a bright Blue. Once the options are set press Ok. Next, go to Image> Adjustments> invert which should make the blues a brown color. Now that is done select the square "stop playing/record" button at the bottom left of the actions pallette. In the pallette under the name of your action set> action name there should be an entry for Neon Glow and Invert. At this point close the oppened image without saving.
For the Final Steps select File> Automate> Batch. In the batch menu select your action set from set and your recorded session from Actions. For the Source select Folder then Choose and select the folder with the original image sequence from the folder list. In the check boxes only leave the "suppress" check boxes selected like in the image below. Select Folder for Destination and then use Choose to find the same folder as before but in the folder browser select Make New Folder which place a new folder in your existing folder. The override action check box should be switched off if not already.
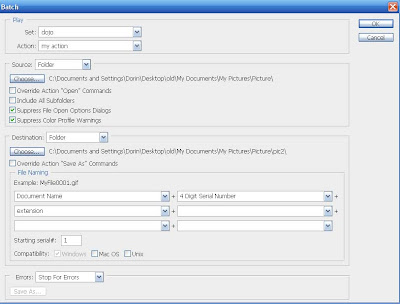
For the File naming convention select Document Name + 4 digit serial number (this allows up to 9999 frames in the image sequence) + extension from the first three selection boxes. Set the starting serial to 1. Finally, select desired operating system compatibilities and tell PhotoShop to Stop for Errors from the Error list. Once you press Ok photo shop will open each image in the sequence, add Neon Filter, Invert Image, and save image with the frame number in the new folder. Once Photoshop is done you will be able to import the image sequence into most video editing and composting packages.This work flow allows for limit less possibilities for video production and the actions are also saved for future use.
Thanks for Reading........
Monday, March 17, 2008
Examples based on my seamless tutorial
These seamless patterns where made using the technique in the last tutorial.
http://seamlesstexture.blogspot.com/
Saturday, March 15, 2008
Custom made Seamless Texture Tutorial
Custom made seamless textures in Photoshop
- To start of with go to File>New to create a new document.
- In the create new document screen I'm using the following settings.

- I set width and height to 1024 pixels with a resolution of 72 pixels/inch. Having width and height the same is common practice but some certain patterns require different dimensions. If you are planning to print the pattern then use inches or centimeters and the resolution should be at least 150 dpi.
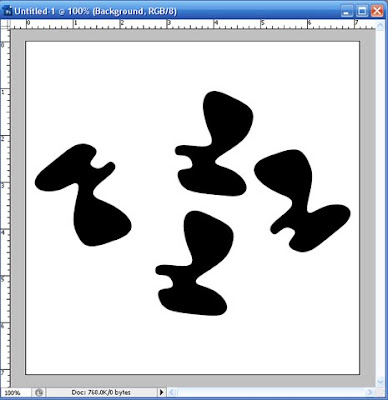
- Working on the centerlines of the canvas create a few shapes like shown below. As long as nothing is overlapping the borders of the document then the next few step are a breeze.
- Make a copy one of the original shapes and select all layers except for the just copied.
- Under the Layer menu select merge layers.
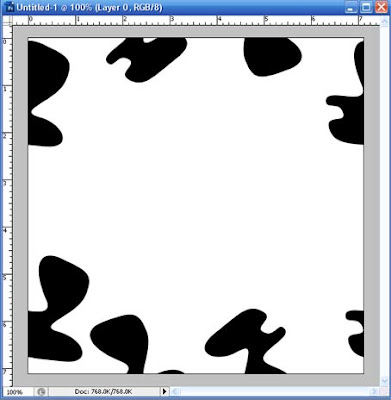
- Under the Filter menu select other>offset. This filter will flip anything from the center to the border. Set horizontal and vertical pixels to half the width and height of the document. verify that the wrap around option is picked.

- Notice the image below after the filter is applied.
- Now copy that original shape a few time and place them around the image like before(just stay away form the borders).
- Finally, merge all the layers and that is what we call a seamless texture. If you don't believe me hit the offset filter a few times and notice how the images don't show any seams.

- To get the below texture I duplicated, rotated, colored, and offset the layers with different pixel dimensions pixels. Once seamless a pattern can be offset by any dimension and still work.

Thank You for reading.
Subscribe to:
Posts (Atom)